News
Tutorial: Painting Wood Effects August 26, 2015 14:42
After the release of my first batch of Eastern Front, Eastern European / Russian buildings which are predominately natural wood, I recieved a number of requests on how I achieved the painting effect.
Please note......ENSURE EACH LAYER OF PAINT / WASH IS FULLY DRY before going onto the next step. This will avoid dragging up foundation layers of paint and "muddying" the colours.

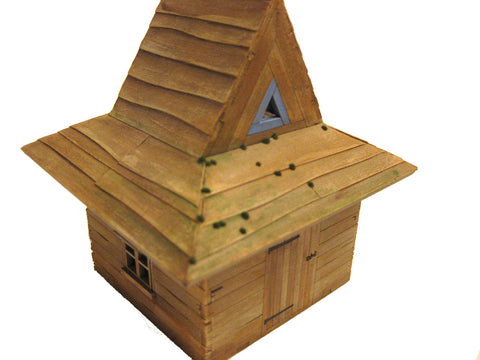
In this brief tutorial I will take you through step-by-step on how I completed painting the prepared "Hunter's Lodge" in just one hour.
Step 1: Assemble the kit according to the supplied instructions.
Step 2: Glue the waney edged cardboard tiles (supplied with the kit) to the roof. start at the bottom and work up towards the top. After each "plank" is glued coat with full strength PVA on the top to seal the cardboard. As you coat the PVA, it will start to dry, drag this along the length of the planks and this will provide grain texture when fully dry. Trim excess card with a craft knife when each side is dry.

Step 3: Using car primer, spray grey then overspray with Halfords Khaki matt paint. 
Step 4: The hour's painting starts here! Using a wide brush, drybrush UPHILL at first to pick out the timber edges then along the planks with a light scrubbing motion (use an old brush for this). I used cheap Tan coloured acrylic from the Hobby shop called "Crafters Acrylic". Apply a lighter drybrush of Crafters Acrylic Bleached Sand (Bleached Bone would work just as well). At this stage the model will look too light and chalky.

Step 5: Apply a wash (I used Games Workshop Agrax Earthshade) to selected random wall planks, using the engraved lines as a guide. On the roof apply the wash towards the top of each plank to emphasise the depth of the planking. When applying washes in this manner, apply quickly and wipe any excess with a finger to blend. At this stage, it all looks too stark and stripey. This needs to be toned down to bring the colours together.

Step 6: With a very watery mix of medium brown acrylic (I used P3 Formula Bloodtracker Brown) liberally coat the whole model exept the light edges to the windows to retain their definition. As the paint drys, rub excess away with a finger, this action will reveal the lighter colours underneath. This rich brown wash unifies the colour and reduces the contrast yet provides depth.

Step 7: I watered down a very dark brown acrylic( in this example, I used Vallejo Charred Brown) to a milky consistency and selectively applied around the lower planks of the model, under the eaves, under the door hinges and window cills. A small amout of wash was also between the roof planks to give a little extra depth. I then used a pale blue to pick out the skylight frame followed by black on the door hinges and latch. A watery mix of medium green (in this case Vallejo Luftwaffe Green) was applied to areas to represent algae growing on shaded sections of the roof.

This mode l was complete in one hour. I did use a hairdryer to speed things up. For the other Eastern Front wooden buildings I painted them like a unit of troops and applied each process to each model in turn, when I got back to the first model it was dry enough to go onto the next stage.
Please do try this method on your Charlie Foxtrot Models builings. If you keep the paint thin and it does go wrong, it will be easy to overpaint and try again. Good luck.
On the workbech: "La Brasserie" coming soon in 20mm 1/72 scale June 23, 2015 12:05
|
Coming soon to the Charlie Foxtrot Models range of buildings is a 20mm 1/72 scale version of "La Brasserie". The little version has a 116mm x 82mm footprint and stands 152mm high. Plastic strip for ridge tiles and plastic tube will be included in this new kit, just like the "big sister" version. Please watch this space for when the model becomes available. The picture is of my final prototype and copies are being cut as I type. I am waiting on my supplier for thinner plastic pipe for the chimney to reflect the smaller scale model. This kit will be ready in time for the forthcoming Bovington show. This addition to my range is in response to the gamers who spoke to me at both Exeter and Weymouth shows requesting 20mm buildings for both Bolt Action and Battlegroup. Further kits are planned and will be released over the coming months. If you have good eyesight and noticed that the 20mm model stuck to a 1p coin is an Italian, please accept my apologies. If you did not notice this; please disregard this last paragraph. |


On the Workbench: School, Church, Chapel of Rest, Civic Building May 12, 2015 21:05
I have just completed a new kit. This project started on the day I opened my webstore www.charliefoxtrotmodels.com. I took a lot of pictures of this building which I found really interesting. I have spent many hours since, drawing and developing my prototype of the kit. All I need to do is complete the packaging and cut some stock, prior to release.

This building was originally a village primary school yet could easily be a church, chapel of rest or town hall. I originally was going to run with the title "L'Ecole" to further my WW2 Europe collection. Having made the model I feel it has great potential in Bolt Action, "A Very British Civil War" , alternative history and Dad's Army themed games. The Warlord Games Germans and Army Group North SDKFZ/10 give an indication of size......this kit is HUGE!
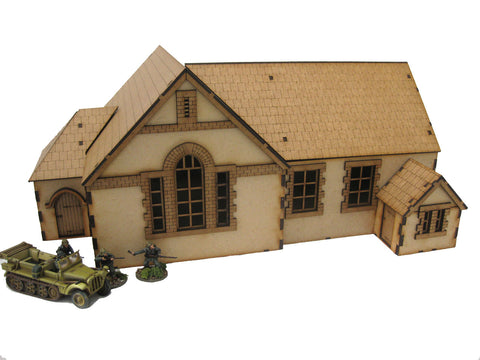
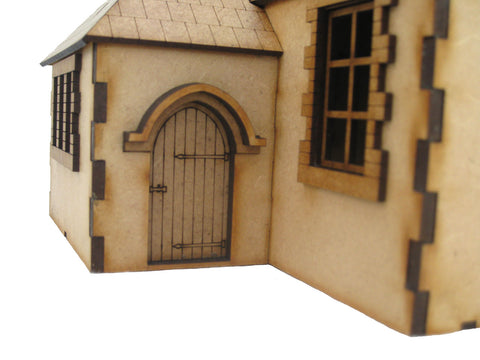

Breaking away from how I usually present my model kits (with printed instructions), I have taken step-by-step assembly pictures which would be posted on this site for reference.
I would be grateful for ideas on how I should name this multi-use kit and if you think on-line instructions are preferable to paper copies.
Colin
On the workbench April 3, 2015 12:28
It has been a busy week, this website was launched and within 24 hours I had my first online order. Thanks Barrie from Tazmania, I have posted your models and put in a small freebie for you!
I had a large acrylic order arrive from my supplier so look out for new templates and tokens soon. First up are a set of 10 black acrylic "Skull Tokens". These can be used over a number of gaming systems. Considering they are very light in weight they are unlikely to inflate your postal charges.
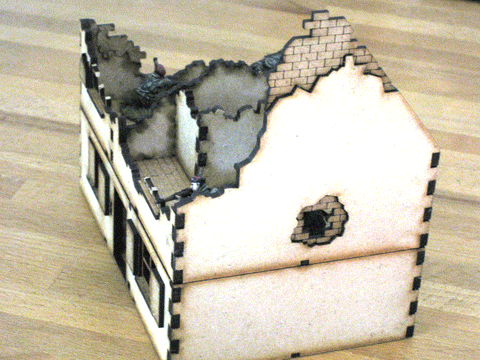
When proof reading my descriptions etc, November Foxtrot (the wife Nik) asked if I had left off "Ruined House 3" as I had not listed it. The reason for this is that I had produced the model over a year ago and was not happy, there was something missing; it just didn't look right. A few people asked to buy the original at the Plymouth PAW show in February but I had not gone into production with it. This week I reviewed the computer files again and thought a quick fix was in order.
This did not turn out to be the case and a major revamp took place until I was happy with the result. The following pictures are Mark 2 "Ruined House 3". Before this can be listed in the shop, I need to draw a packaging header and an instruction sheet. I also plan to move the hole in the wall at the raised gable end. All was fine on the positioning until I got the bright idea of having more exposed brickwork. This made the hole lower and only kneeling models can fire out.
Any other improvements are gratefully recieved......for example, I envisiged the building hit from a tank HE round or two. I did the stairwell slightly higher so the trajectory looks right. Have I over thought this? Does it need to be lower to see the staircase better or is having some total block of line of sight a better payoff? Looking forward to comments and suggestions...


For the coming week I will be finishing the painting of a large model with a footprint of almost a square foot. Watch this space...
Happy Easter,
cheers Colin