Guest Tutorial " How to make MDF Buildings" by Matt Owens-Smith September 23, 2015 18:32
Good chum and expert modeller / painter Matt Owens-Smith posted this blog entry on his site www.wargamestableblogspot.co.uk
Thanks to Matt for giving permission to "pinch" wholesale.
How to make MDF buildings - Part 1
This post aims to explain how to go about constructing MDF buildings, specifically those from Charlie Foxtrot Models. In subsequent posts I'll go on to look at how to paint them too.
I decided to do this after chatting to a few people at Colours. Some seemed a bit put off from making and painting them, but if you can build and paint figures ok then buildings should be no problem.
My first example will be one of Colin's lovely farmhouse kits. Here's the official picture.
Here are the components.
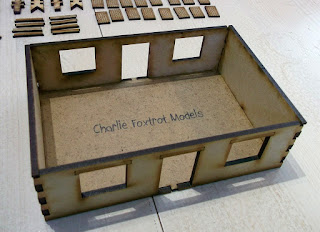
I usually begin by building the ground floor. A very important point to bear in mind is to always 'dry fit' any components before gluing. That is, check out how well they fit and how it looks by holding the pieces together - or maybe use some blu-tak. It's a good way to check that it all fits and looks right.
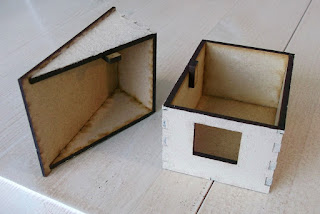
Here's the ground floor.
It all fits nicely, so it's time to get out the glue. Use good quality wood glue as it's stronger, doesn't shrink and dries clear. I normally use Evo-Stik Interior Wood Adhesive. Blob some on to a palette and then use a cocktail stick to apply the glue neatly. Less is more, so to speak, as the joins generally fit flush you really only need a small amount of glue. Wipe off any excess that seeps out of the joints using a damp tissue.
Another tip - Colin puts plenty of pictures of the finished article on his web site, usually from a variety of angles, so use those pics to help you figure out what goes where if you're not sure.
Roof: I suggest that you spray the tiled roof sections black or dark grey before you assemble them.
The upper floor also has some guide pieces to help it fit snugly on to the ground floor. They stop the upper floor sliding around too easily.
The tip here is to glue them in the corners (aligned to the edge of the base, inside the walls) then place the upper floor on top of the lower and give it a tiny wiggle. Then they'll fit neatly but with enough 'tolerance' to make it easy to lift on or off. The roof has similar pieces that glue on the inside of the gable ends.
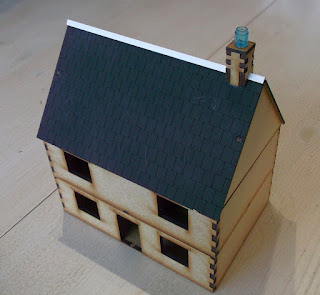
Chimney: The instructions show how these pieces fit together to make the chimney stack - hopefully you can see it's very straightforward. You'll need to shave some of the components to make them fit the angle of the roof.
The kit includes a length of plastic pipe that you can cut to make a chimney pot but I've found that cyclindrical lego 'bricks' give a good result for much less effort. Also included is a length of plastic strip to act as ridge tiles for the roof. I've glued on the chimney and trimmed the plastic to fit either side.
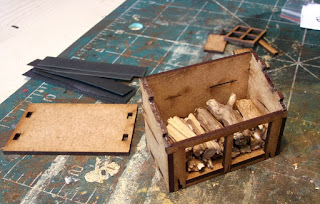
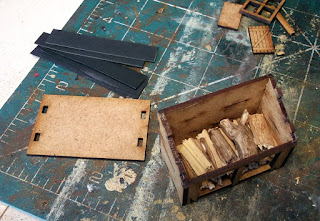
To add further interest I've built a CFM log store. A tip here is to leave off the roof so that you can glue 'logs' in place. The logs themselves are simply bits of dried twig snapped to the right length.
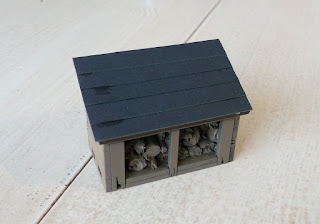
With the roof; made by overlapping strips of card.
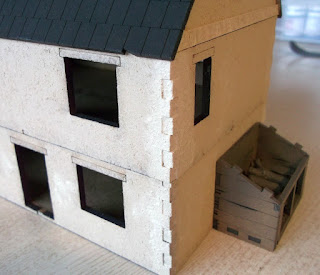
Fore even more variety I've added a CFM extension.
It's been built in exactly the same way as the main building.
The next stage is to apply the texture to give the walls a roungh, plastered or rendered appearance. I use cheap masonry paint - be sure to avoid the smooth types as you need a little grittiness to give the right texture. For extra texture you can mix in fine sand. Other gamers use something called Chinchilla Sand - basically a fine grained grit. (The lady in the local pet store gave me a very odd look when I asked for it, so I left. I'll stick to masonry paint!)
Warning! Make sure you keep all of the door and window apertures completely clear of any paint or texture otherwise it becomes a real bother to fit the doors and windows later!
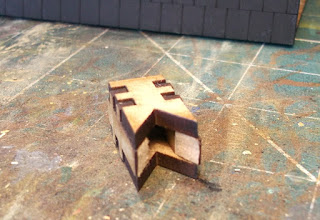
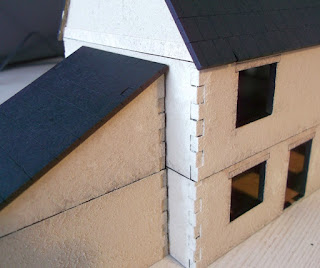
Some close up pictures of the texture.
Tip - keep a cocktail stick or similar sharp item to hand whilst texturing as it comes in handy for removing any texture from the etching above the window frames.
You'll see that the dovetailed corners give the impression of stone blocks. You could enhance this by adding your own blocks made from small squares or rectangles of thin card (I may try this out on another building) but for now I'm happy with the standard finish.
The textured building ready for some paint!
Summary of tips
Thanks for reading!
I decided to do this after chatting to a few people at Colours. Some seemed a bit put off from making and painting them, but if you can build and paint figures ok then buildings should be no problem.
My first example will be one of Colin's lovely farmhouse kits. Here's the official picture.
Here are the components.
I usually begin by building the ground floor. A very important point to bear in mind is to always 'dry fit' any components before gluing. That is, check out how well they fit and how it looks by holding the pieces together - or maybe use some blu-tak. It's a good way to check that it all fits and looks right.
Here's the ground floor.
It all fits nicely, so it's time to get out the glue. Use good quality wood glue as it's stronger, doesn't shrink and dries clear. I normally use Evo-Stik Interior Wood Adhesive. Blob some on to a palette and then use a cocktail stick to apply the glue neatly. Less is more, so to speak, as the joins generally fit flush you really only need a small amount of glue. Wipe off any excess that seeps out of the joints using a damp tissue.
Another tip - Colin puts plenty of pictures of the finished article on his web site, usually from a variety of angles, so use those pics to help you figure out what goes where if you're not sure.
Roof: I suggest that you spray the tiled roof sections black or dark grey before you assemble them.
The upper floor also has some guide pieces to help it fit snugly on to the ground floor. They stop the upper floor sliding around too easily.
The tip here is to glue them in the corners (aligned to the edge of the base, inside the walls) then place the upper floor on top of the lower and give it a tiny wiggle. Then they'll fit neatly but with enough 'tolerance' to make it easy to lift on or off. The roof has similar pieces that glue on the inside of the gable ends.
Chimney: The instructions show how these pieces fit together to make the chimney stack - hopefully you can see it's very straightforward. You'll need to shave some of the components to make them fit the angle of the roof.
The kit includes a length of plastic pipe that you can cut to make a chimney pot but I've found that cyclindrical lego 'bricks' give a good result for much less effort. Also included is a length of plastic strip to act as ridge tiles for the roof. I've glued on the chimney and trimmed the plastic to fit either side.
To add further interest I've built a CFM log store. A tip here is to leave off the roof so that you can glue 'logs' in place. The logs themselves are simply bits of dried twig snapped to the right length.
With the roof; made by overlapping strips of card.
Fore even more variety I've added a CFM extension.
It's been built in exactly the same way as the main building.
The next stage is to apply the texture to give the walls a roungh, plastered or rendered appearance. I use cheap masonry paint - be sure to avoid the smooth types as you need a little grittiness to give the right texture. For extra texture you can mix in fine sand. Other gamers use something called Chinchilla Sand - basically a fine grained grit. (The lady in the local pet store gave me a very odd look when I asked for it, so I left. I'll stick to masonry paint!)
Warning! Make sure you keep all of the door and window apertures completely clear of any paint or texture otherwise it becomes a real bother to fit the doors and windows later!
Some close up pictures of the texture.
Tip - keep a cocktail stick or similar sharp item to hand whilst texturing as it comes in handy for removing any texture from the etching above the window frames.
You'll see that the dovetailed corners give the impression of stone blocks. You could enhance this by adding your own blocks made from small squares or rectangles of thin card (I may try this out on another building) but for now I'm happy with the standard finish.
The textured building ready for some paint!
Summary of tips
- Use good quality glue as it will have minimal shrinkage, be stronger and dry clear.
- Dry fit the components. My Father was a carpenter and always said "measure twice, cut once"... in this case dry fit twice, then glue once!
- Check that you have all the bits (Colin is very good - you'll often have a few extras!)
- Follow the assembly instructions - if they're supplied. Yes I know most of us are blokes but the instructions are supplied for a reason!
- Use the website pictures as a reference if you're not sure of any part of the build.
- Spray things like roof sections before building.
- Use lego bricks as chimney pots.
- Buy a small pot of magnolia textured paint - a good base as many buildings will be off white or grey.
- Keep any textured paint away from the window/door apertures.
Thanks for reading!


