Tutorial Rivers & Streams part 3 November 20, 2022 11:11
This next technique is valuable to show movement in the water and how different scenic pieces can be enhanced by white water.


On this river tributary section, I completed the modelling like all other sections and made the following enhancement. I used 2 part clear epoxy resin from the pound shop and "daubed" it with a cocktail stick in places where I felt the water would be agitated. I left this to partially dry for some 15-20 minutes (try on a scrap piece first!). My next step was to mix a small amout of clear epoxy resin and stir in a small amount of white acrylic paint. I then added the whitened epoxy resin again using a cocktail stick and dragged, swirled and daubed in the direction I thought the water would flow.
For an extreme highlight, I added a further dab of white acrylic to the mix and repeated the process on the "crests of the waves".
This technique has been used for a number of my "special sections".
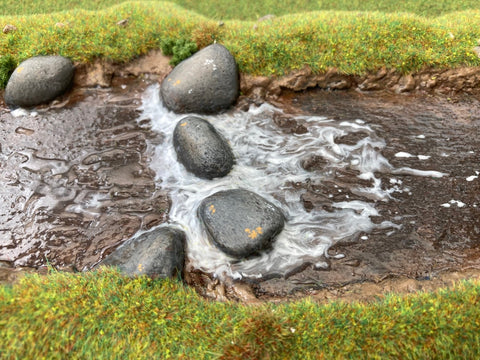
First being the Ford. The Ford Section is part of the River Starter Set and provides another crossing point.
The Ford Section was made with lower river banks at the widest point. Small pebbles and gravel (rounded from a fish tank) and sand was glue onto the banks and along the centre where I wanted shallower water. Note alos the dark brown of the river bed did not fully coat the piece and a paler "shallows" was left.

The gloss varnish, epoxy resin and finally flock and tufts were applied.

A close up of the ford section shows how the addition of white water enhances the illusion of water flowing.

This stepping stone piece provides a crossing point over a stream. The white water I wanted deeper and with more movement. I followed the same steps as the ford section and using clear epoxy resin I built up an area before and after the painted pebbles. I allowed this to set overnight then repeated the clear, clear with white acrylic mix to get the desired effect.

Multiple crossing points are, in my opinion, essential on the wargames table. Just one provides less tactical options and all focus is directed on one point of the battlefield. This idea was more "rustic" a fallen log bridge. I searched the garden for a suitable long dead twig and placed it on the top of our log burner for 3 succssessive evenings to thoroughly dry it out. Why 3 evenings? I was not ready to work on it until then!
I built up the riverbanks and trimmed the twig to sit flush with the river bed. The unpainted twig was then pressed into the still wet sculptamould giving an indentation to use as a locating point later.
The log was painted in a variety of browns and greys and glued into place. This was follwed by the usual flocking, tufts and white water. I then used self adhesive "mininatur" moss pads along one side of the fallen tree.


I am working on another, final section for my collection and will post " Tutorial Rivers & Streams part 4" soon.