News

Tutorial: Step by step "Ponds" April 13, 2016 19:15

To assist modellers with putting together "Ponds 1 & 2" I have done a step by step tutorial. I hope this helps you to achieve an effect you can be proud of.

The "Ponds 1 & 2" can of course be done in a range of different styles to represent different geographical locations from Europe/ America to African Desert even to Mars! Scale would be dependent on the size of the grass tufts / sand or other scenic effects applied. Your choice of colour would naturally determine the finished look; so here are a few pointers to get you started.

In the kit you will recieve 2 pieces of MDF and one shaped clear acrylic insert. Put the acrylic aside and use PVA to glue the top "frame" to the base. Using an almost dry PVA brush, lightly coat the bottom of the pond to prime the bare MDF. When dry paint the base of the pond with your basecoat. This shade should be dark. I have used Vallejo Green Black.

Use a wide large drybrush and stipple in lighter shades where the pond will be shallower. Aim for a grainy mottled effect. here I used a mix of the basecoat and Vallejo Reflective green. Sussessive coats were stippled on adding more reflective green until I achieved a mid tone.

Peel the protective polystyrene sheet from the acrylic on one side, being careful not to touch the revealed surface, place in the pond apeture. Once in place, peel off the other sides protective polystyrene. I use this method to avoid sealing in fingerprints which your friends would no doubt take pleasure in pointing out. Use PVA / all purpose adhesive to fix rocks and gravel or sand to part of the surround. Run a bead of full strength PVA around the gap between the acrylic and MDF. There is a 0.5mm gap to accept this glue...do not water the glue down as it may seep under the acrylic.

I bundled together cut bristles from an old shaving brush and bedded them into a thick layer of glue. The smooth glued surface will be painted to look like a muddy area.

Taking care not to get paint on the "water" paint the rocks, gravel and mud areas. I applied a wash to the reeds to get a green tint. Colours used were Vallejo Charred Brown followed by Vallejo Earth Brown with Hubrol Sand and finally Americano Bleached sand.

Paint the remaining surround with an earth colour to act as a base for the final scenic effects.

Gloss varnish the muddy areas to give a wet look then apply static grass, flock or grass tufts to the surround and when dry, paint lilly pads and duckweed onto the top of the acrylic. Adding this detail gives more visual depth to the pond. I also trimmed the bristles down from their full length to a more "in scale" proportion.

The same techniques were used in the Charlie Foxtrot Models soon to be released range of oasis with the greens being substituted with sandy tones and browns.

 With no expensive messy, smelly resin with a short shelf life, the acrylic sheet can give a highly effective water effect.


New Release "Paint Stand suitable for GW bottles" April 12, 2016 09:10

Having had a number of requests to expand the stackable paint stand range, I have just released a 28 bottle stand. This self assembly stand can hold 28 GW style paint pots.

I have been very productive over the last few weeks and this is just one of 12 new designs to be released in the next week. Please check daily or "like" the Charlie Foxtrot Models Facebook page for updates.


New release: "Walled Tile 2" March 22, 2016 11:23

I designed this product to make more of some of my most popular buildings. The "Walled Tile 2" provides a parking space, eating area, back yard for sheds / W/C etc and once painted, will look so much better than simply placing models directly onto your battlemat.

For gameplay, the walls provide hard cover and are of a suitable height to allow troops to fire over. Equally suited to a rural or urban set up this tile can accommodate either the cafe or residential "Dormer House 2" from Charlie Foxtrot Models. "Workshop" or "Workshop 2" will complete the set. Depending on your building choice, this kit may be used for Napoelonic, WWII to modern day games.


Wargames Soldiers & Strategy : Product review. March 8, 2016 11:54

I was happier than usual to recieve my issue of Wargames Soldiers & Strategy (issue 83) in the post. Not only has Guy Bowers reviewed my Eastern Front "Rural 2" I also have had my 3rd "Parting Shot" published giving tips and ideas to enhance your Charlie Foxtrot Models MDF buildings. I am now looking forward to issue 84 and the forthcoming articles on Normans and the Crusades.

Kings Of War March 8, 2016 11:32

Being a massive convert to Kings of War, I am in the process of reorganising my Empire of Dust army so far: Scavengers, Chariots and Monolith are complete. The chariots are metal GW High Elf models with the details ground off and reigns added. The monolith is a resin model I picked up at Beachhead in Bournemouth. I added the statue and cut myself an MDF base. Movement trays by www.charliefoxtrotmodels.com...of course! (this is just an excuse to post some of my private collection)

Guest Tutorial "Signal Box" by Matt Owens-Smith February 23, 2016 15:09

Matt Owens-Smith (a prolific modeller & blogger) has once again dleivered a top quality piece on:

Charlie Foxtrot Models - Building and Painting the Signal Box (click on image to enlarge)

More of Matt's work can be seen on thewargamestableblogspot.co.uk

Wargames Table chum Colin has produced yet another superb building – the Signal Box – so I’d like to show you how it all goes together and offer some suggestions for painting it. Here’s the kit, all 79 pieces of it!

This is Colin’s. Lovely!

In this picture I’ve labelled the ‘groups’ of pieces. Note – the rectangular piece in the bottom left of the upper floor group is actually the base for the signal levers – Doh!?

Because (a) the upper floor has two layers of wall and (b) the balcony and stairs could be a bit fiddly to paint in situ, it makes sense to spray/paint some of the components before building the complete model, I'll mention this later. Tip - always dry fit any pieces before gluing and use good quality wood glue.
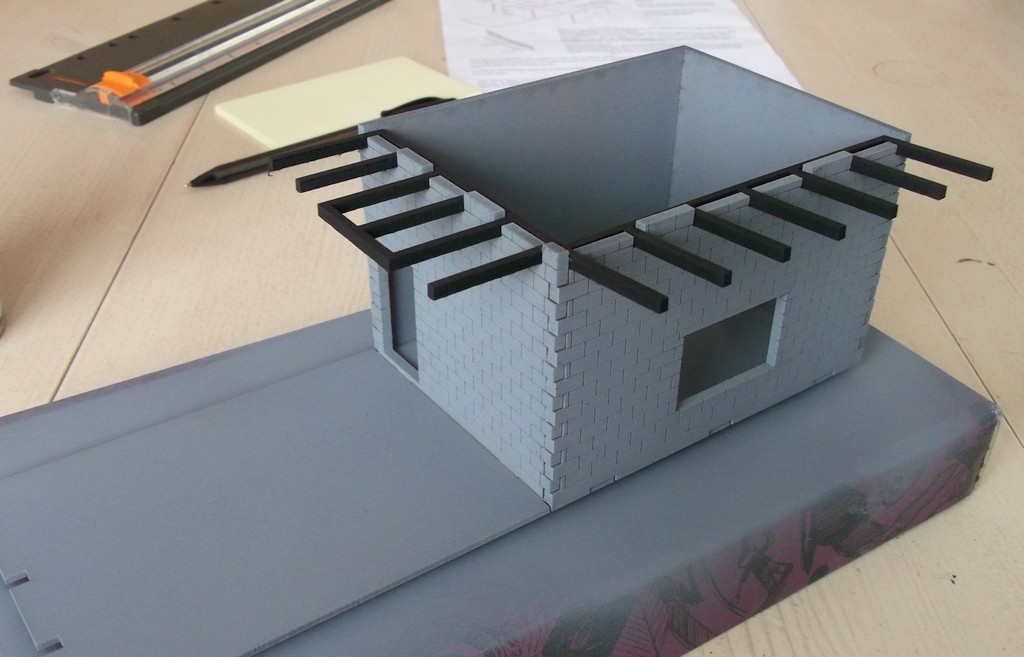
Lower Floor
This just a straight-forward box, four walls and a base, plus the comb shaped balcony supports – make sure you get them level. Now for the base colours. Grey primer spray; the supports are blocked out in black.

I applied a very thin wash of black/dark brown ink to help pick out the blocks.

Then I just highlighted the concrete blocks with Foundry Slate Grey mid 32B then light 32C. The window frame and doors are painted then glued in position. I used GW Khorne Red followed by GW Mephiston Red - that's the same for all the red items.


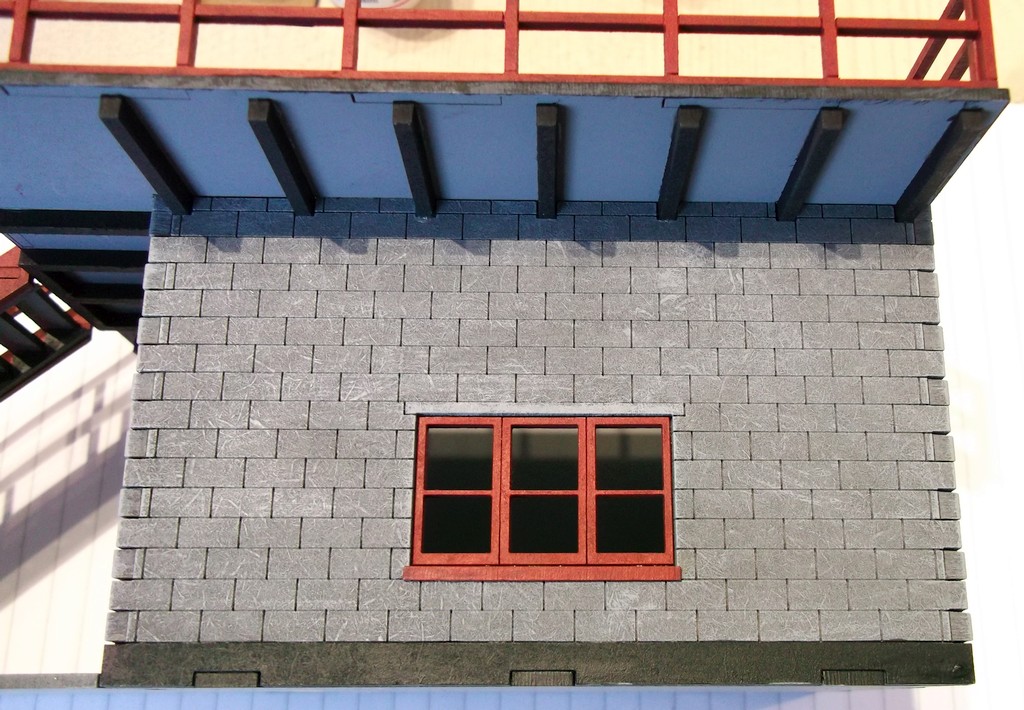
Paint the lower section in black as a lot of these buildings seem to have a 'bitumen-like' paint applied. I also added a couple of grass tufts to make it look like weeds are sprouting.
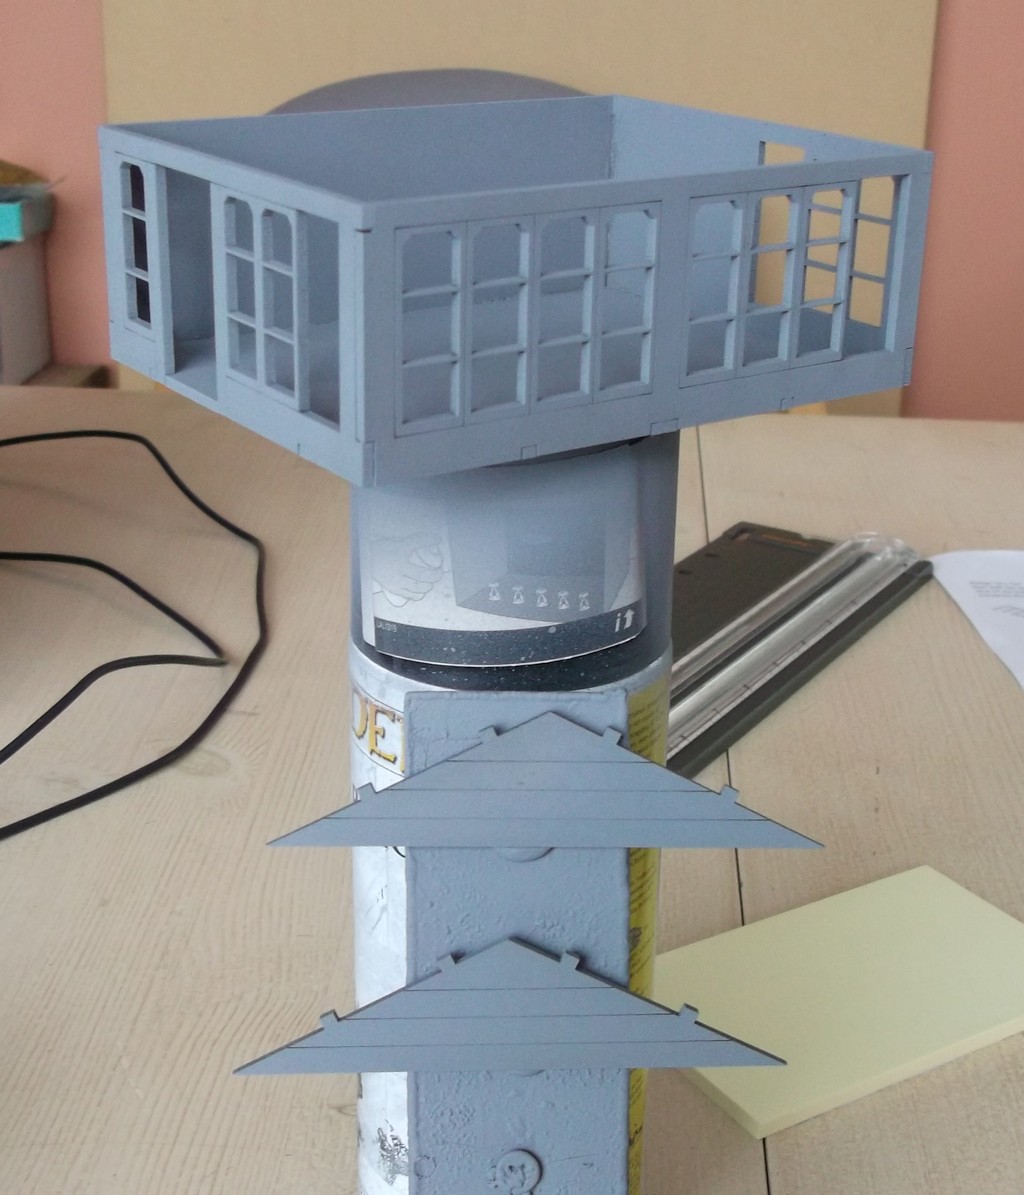
Upper Floor
Here's the inner layer of the upper section built and undercoated. Grey makes for a good general purpose base. The gable ends are also shown.

As I mentioned earlier, some of the components are best undercoated before construction. These pieces are the outer layer of timber framework. They'll be red but again I started with a grey undercoat - this is because raw MDF can be quite thirsty for paint.

The 'white' panels are first sprayed with white (GW White spray) - don't overdo it as the result can be a funny speckled finish. Then just paint the central area of each panel with white, taking care not to obscure the fine lines.


The window frames are just blocked in white. As with Colin's example I've glued some of the windows as though they've been slid open.

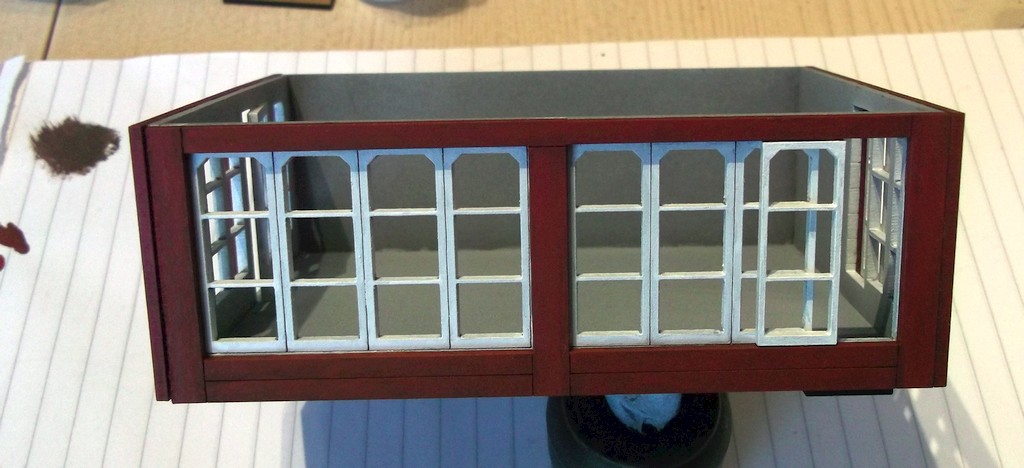
I've glued the door slightly ajar too.

After painting the white 'planks', the red panels are painted then glued in place. I'll look at the roof and gables in more detail a little later.
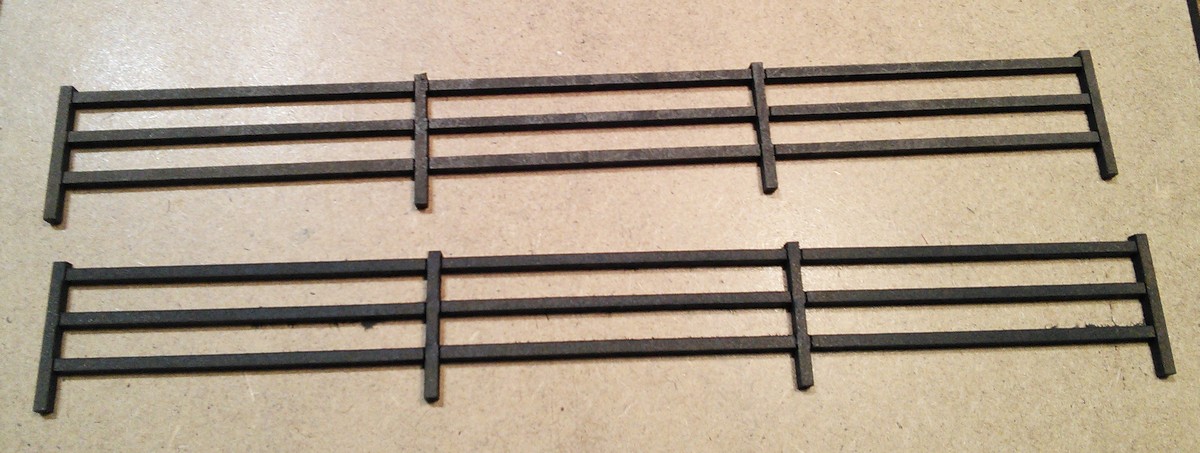
Steps & Balcony
I thought these might be a bit fiddly but Colin's crafty design makes it easy – best tip I can offer is not to rush! Three of the steps act a locating ‘pins’ (an instruction sheet is included showing these) which allow you to build the basic structure. When the glue is dry you simply pop each of the remaining steps in to place.
When you glue in the railings to the L-shaped balcony section make sure you dry-fit them first just to make sure you’ve got them all lining up nicely.

The balcony railings and stair rails are painted in exactly the same way as the panels for the upper storey.

The balcony floor and steps were painted black then just roughly highlighted with Foundry Charcoal Black 34B. Again do the painting before attaching the balcony and steps to the base. Tip - the bare ends of tabs on the lower section (that plug in to the balcony) can absorb the spray/paint and expand very slightly so you may need to trim or sand them a little.

Roof
The first thing to do is spray the roof tile sections with matt black – a dark grey would be good too. Then spray the gable wall ends with mid-grey followed by white.

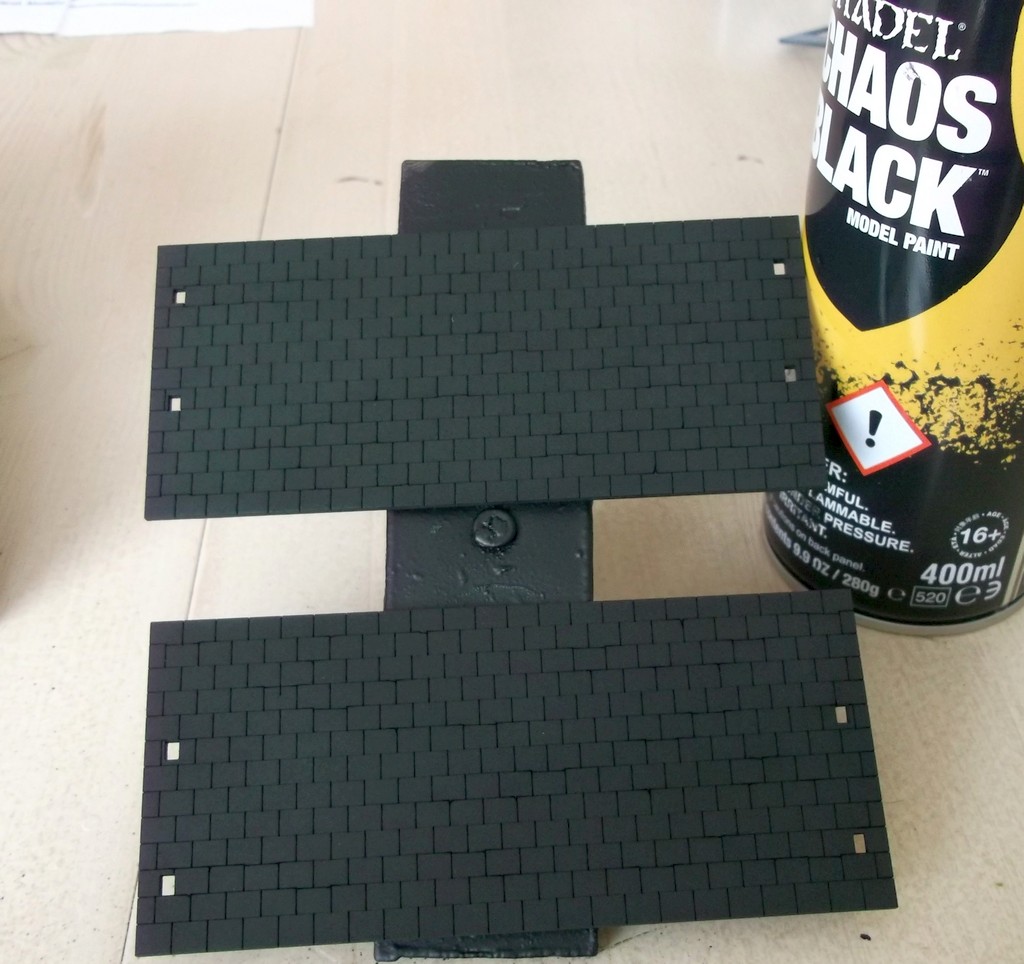
Next, paint the gable end planks white then the timbers - same red scheme as before. The roof section can now be assembled. Trim the capping tile strip to the right length, spray it and attach. Here's the gable end.

I have a quick method for painting roofs. Using Foundry Slate Grey shade 32A, Stone shade 57A and Granite shade 31A, I pick out half a dozen or so individual tiles on each side of the roof, including some sections on the capping strip. Then I just drybrush with Slate Grey mid 32B. Finally apply some clumps of moss (mini-natur).

Levers
A signal box needs the levers that operate the points and this kit doesn't disappoint! Two slots are left empty as these levers will be pulled forward. I've propped them against the wall whilst the glue dries to make sure they are all at the same angle.

Again the grey undercoat.

The completed levers!

The Finished Article
Here it is!

and


The track is a work in progress - more on that in future. Hope you found that interesting and/or useful.

New release "Red Brick Walls" & "Stone Walls" February 23, 2016 12:37

To compliment the "Georgian Gateway" and "Farm Tile" I have released a range of wall sections. Lots of variation in a modular system means the walls can be configured in many different ways. The generic walls are suited to a wide range of gaming scenarios. If there is a configuration you would like that I may have missed, please mail me and let me know.


Guest Tutorial : "Post & Rail Fences" by Matt Owens -Smith February 17, 2016 18:28

Matt, a regular blogger (http://thewargamestable.blogspot.co.uk/) and good mate has just completed a set or two of Charlie Foxtrot Models "Post & rail Fences" and was kind enough to let me lift this tutorial:


Step 1: Take the raw MDF and very lightly spray with matt black - just a dusting really so that some of the wood colour shows through. Hopefully this pic shows what I mean.

Step 2: Drybrush with any dark brown. I used VMC Leather Brown.

Step 3: Drybrush (very lightly!) with a light cream colour. Here I've used VMC Dark Sand.

That's it! All 12 sections took me less than an hour.

Step 4: Glue the fences to the bases.

The gate sections have subtly different bases and I like my gates to be slightly open as it makes them easier to spot at a glance.

Step 5: Apply sand and grit to suit your basing preferences.

Step 6: Paint the bases. I bought a tester pot of emulsion as it's way cheaper than using VMC etc. I think it was called 'coffee shop' but was fairly similar to GW Graveyard Earth.

Then I highlighted it up using my usual VMC Flat Earth, Gold Brown and Dark Sand colours.

Step 7: Finally, decorate them - I always really enjoy this bit - in fact I probably spent more time on the flock and foliage than the painting.


That's 6 feet of fencing done in double quick time.
Thanks Matt
Matt assisted me with my trade stand at Crusade Penarth and in lieu of salary, he chose a  "Signal Box" kit....having seen early pictures, I cannot wait to see his step by step tutorial on that model. Matt thanks for your help and keep on blogging, your enthusiasm is infectious.


Best In show PAW 2016 February 8, 2016 18:01

Customer (and now good chum) Brian Collins scooped the "Best Demo Game" at Plymouth Association of Wargames annual show. Brian's table was largely populated with Charlie Foxtrot Models some of wich appear in the Customer Gallery. Well deserved Brian......how will you top that next year?


New Releases: "Driveway & Pond" and "Gateway" January 12, 2016 11:23

These two kits make an imposing centre piece for a battle objective when combined with the "Georgian House".

Please note: Fish food is not included with this kit!

The "Driveway & Pond" comes with two 3mm clear acrylic discs. When the pond is painted inside, place in a clear disc. The second disc can be painted underneath to show fish or weed and the top side can be decorated with lilly pads and duckweed. The tiled 2mm ring covers the waters edge.

SPECIAL: For a limited period, the "Driveway & Pond" will be given FREE to customers who buy both the "Georgian House" and "Gateway". Charlie Foxtrot Models reserves the right to withdraw this offer without notice.


New Release: 28mm 1:56 Signal Box January 5, 2016 11:43

Happy New Year to all my friends, customers, friends who have become customers and customers who have become friends.

Thank you for placing orders on the run up to Christmas. I look forward to seeing pictures of your painted models in due course.

I invested in the cheap Poundstretcher railway set some time ago ,after reading reviews on Facebook. I have been itching to make some associated scenery, the "Signal Box" being the first in a planned themed set.

While I have been frantic, cutting, wrapping and shipping kits, I have now found the time to be able to release the "Signal Box". I could not wait to paint this model!

To be released later this week, once the simple instructions and packaging is complete. Do not be put off by the steps assembly, I have designed them to be a quick & easy build!


New release: Eastern Front "Rural house 4" December 1, 2015 11:31

Yet another unusual model for the Eastern Front range. This model has a distinctive "salt box" roof and ornate carved window frames. With three other rural houses, the "Hunter's Lodge", "Cabin", "Tool Shed" and "Log Store" a village full of character can be laid out on your table. If you would like to achieve a good, quick and simple to follow tutorial on painting wood effects, please visit an earlier blog on this site.