News

New Release: 20mm 1/72 HO/OO "Stone Barn" November 10, 2015 10:52

A new addition to the 20mm collection comes the "Stone Barn" a close copy of the very popular 28mm version. This model can be used for a variety of periods for wargaming or railway layouts. Like the larger version, the roof comes off to allow models to be placed inside. There is a 1/2 width  "hayloft" as a 1st floor allowing access to 3 of the 4 windows.

Next on the workbench will be a workshop to further expand the 20mm farm range.


Cheaper Postal charges for Non-UK customers. November 5, 2015 18:56

Breaking news 5.11.15

I have just trialled a courier company that can offer a huge price saving when compared to UK Royal Mail Parcelforce. Savings of up to 65% have been achieved!

If you are non-UK customer and considering buying 3 or more buildings, please e mail me for a quote, I think you will be pleasantly surprised.

charliefoxtrotmodels@hotmail.com

This courier service is tracked and signed for and can deliver to the USA in 2- 3 working days.

The courier will collect from me. I would need to be home all day to sign for the collection and take a reciept for the parcels. The collection day will be negotiated with you via e mail.

I hope this new service makes owning and collecting Charlie Foxtrot Models a better, more affordable solution to your gaming needs.

Colin


New Releases Kings of War Token Set & 20mm Farmhouse November 3, 2015 11:49

The "unofficial"  Kings of War Token Set, given free with each order of Double Dials or KoW Movement Trays is now avalable to buy in the shop.

Also this week, I am pleased to release an addition to the 20mm range titled "Farmhouse". The farmhouse is a development on the 28mm kits and not an exact copy of its counterpart. Plastic chimney pipe, plastic angle strip to be cut for ridge tiles and plywood shutters are all included in this kit as standard. The dormer, whilst included is optional as is its position. Engraved roof tiles are all over the roof panels so if you require a British looking farmhouse, it is easy to just leave the dormer and shutters off.


New Release: G Scale 1:22.5 railway "Derelict Building" October 29, 2015 18:34

This model is a combination of the 28mm 1:56 scale "Ruined House 2 and Ruined House 3"and was developed as a commission piece to this scale for an indoor display.

As G Scale is much larger additional features were added to the 28mm models to ensure the kit has a realistic appearance. Tiles with nail holes, additional roof trusses, window frames and extra detail on the doors to name but a few.

Approximate dimensions:

Height to top of chimney pot: 430mm

Width left to right: 407mm

Depth back to front: 260mm

This model is the largest piece in the Charlie Foxtrot Models collection and is 2 1/2 times as large as its 28mm counterparts!


New Release: 28mm 1:56 Eastern Front "Cabin" October 26, 2015 09:49

A further release to extend the Eastern Front rural collection is now available in the shop. The "Cabin" has the same footprint as the "Hunters Lodge" 70mm x 70mm square.

New features include: elongated eves, an ornate skylight and a longer chimney stack.

Plastic pipe is included in the kit for the chimney pot and a strip is included to cover the apex seam.

This kit would quite happily sit in a Napoleonic, WW2 or fantasy setting.


Kings of War Token Set FREE GIFT with orders October 21, 2015 15:28

From today until 16th December 2015 orders for "Double Dial Counters" and Movement Trays for KoW will recieve a FREE Kings of war Token Set. Any order for these products over the next 8 weeks will get the tokens. (orders from E Bay will not qualify for the free gift). Please note the tokens are of my own design and are not the "official" tokens produced by Mantic Games.

I have tried to cover all of the scenario and arc angles in this set. (Race specific ...throwing rats and mastiffs will be available soon.)

The token set will be shortly be available to buy separately in the shop for £2.75

You get:

7 x 25mm round objective tokens to decorate like your bases.

1 45 degree template, 50mm war machine line of sight marker and 3" ruler (for control of objective measuring)

3 x loot counters...in the shape of a money bag

4 x Disordered..I chose the double headed arrow as the unit is unsure "which way to go"

4 x Wavering, this design compliments the disordered and is "a bit wobbly" which I thought appropriare.

The 2nd picture shows the template in use in measuring proximity to the objective.


New Release: Movement Trays October 19, 2015 12:13

Having recently become hooked on Kings of War, I have been converting my old fantasy collection over to KoW sized units. Now available in the online shop is a range of movement trays for verteran gamers and new players who do not want to commit to multi-basing.

In the next day or two, I will be releasing details of the FREE KoW TOKENS SET which will be given with every order of movement trays and "Double Dials Counters". Look out for my next posting for further details.....in the meantime you can work out how many trays you need!


Guest Tutorial " How to make MDF Buildings" by Matt Owens-Smith Part 3 October 12, 2015 11:57

Matt continues putting the finishing touches to his Charlie Foxtrot Models "Farmhouse"

How to make MDF buildings - Part 3 (Completed)

This post is all about taking the basic painted building and adding those little extras that will make it look a bit more interesting.

I think buildings always look better with a scenic base. If you're ordering from Charlie Foxtrot then drop Colin a line to ask for a custom base. It will add only a small extra cost and saves you the bother of cutting stuff up. Alas, I forgot to ask for a base so here I've used a piece of 2mm plasticard. Glue the building to it with a few dabs of your favourite all purpose glue.

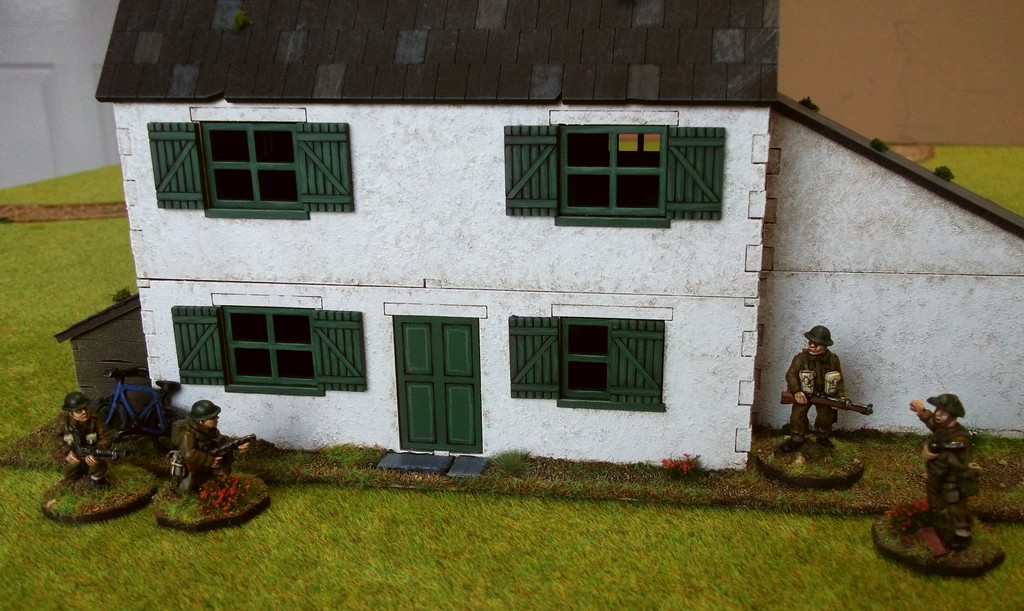
The base is then covered in thinned PVA glue and a variety of grit/sand. You can see that in front of the door I've placed a couple of pieces of thin plasticard that I've carved to look like flagstones.

The sanded base can then be painted to match your other terrain or battlefield. My recipe is VMC Leather Brown base, then highlights of VMC Flat Earth, VMC Gold Brown and VMC Dark Sand. I use two different static grass colours, GW Scorched Grass and the lighter Noch meadow grass (ref 08310).

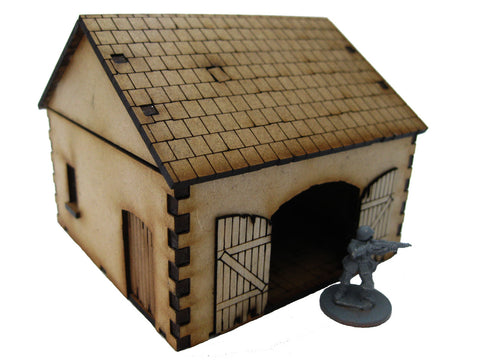
The log store! This was a fairly easy paint job. Spray mid brown then give the wood a solid base coat of any dark brown. I used Foundry Bay Brown Shade. Then dry brush with VMC Gold Brown and VMC Dark Sand. The logs got a heavier dry brush. The roof was painted black followed by dry brush highlights of the Foundry Slate Grey triad.

Here are the flag stones I mentioned earlier. Painted black followed by the Foundry Slate Grey triad. I've also added a few clumps of flower tufts here and there.

To give the model building that 'lived in' look it's good to add a few everyday items. Here's a bicycle from the bits box.

Buckets, barrels, logs, ladders (CFM do nice ladders) all make good extras - just remember to leave enough space for your figures!

The log store - with an axe propped against it. The axe is a spare from the Gripping Beast Saxon Huscarls boxed set.

The roof sections have been 'enhanced' with some mould and lichen. Take a look at any real roof and you'll usually see yellow/orange mould, moss, bird droppings, etc.

In the CFM shop you can see some excellent examples of this on Colin's buildings. Here I've also added some soot to the chimney pot with black and grey.

Now for the interior ... some might consider this straying in to doll's house territory ... but a few little features are worth the effort I reckon. The downstairs has a fireplace plus some flooring from a (*cough*) doll's house makers blog.
Just print, cut to size and glue in with a glue stick (don't use a runny glue otherwise the paper wrinkles!).

Here are the components of the fireplace - some left over bits from an MDF 'sprue' and a bit of card. The 20x20mm square base is just for scale.

The upstairs has a similar, lighter wooden effect printed floor whilst the extension has a brick tile effect. I've resisted the urge to add furniture!

It would be easy to add wallpaper - there are plenty of (*cough*) doll's house sites that offer good examples for you to print, but that's beyond me! Don't even mention LED lighting and sound effects!! :-D

So here's the finished article.


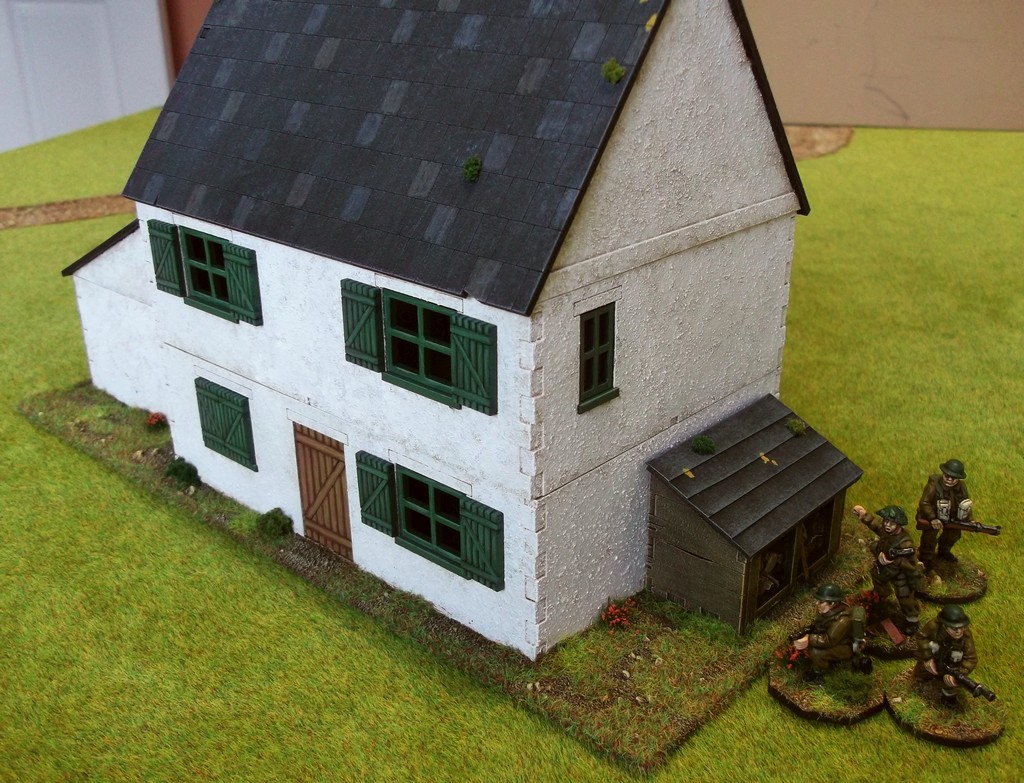
I hope you'll agree that adding some of these extras will make your wargames buildings a bit special. After all, I expect you put heaps of effort in to painting your figures?

So do the same for your terrain!

Happy gaming :o)

Peter Harrison, Talk Wargaming Review : Eastern Front Razed Buildings October 7, 2015 22:57

 Thanks to Peter Harrison for reviewing Charlie Foxtrot Models. I have added Pete to the list of facebook pages I follow. Lots of good advice and impartial observations across the wargames spectrum, presented in a very professional manner.

Guest Tutorial " How to make MDF Buildings" by Matt Owens-Smith Part 2 October 5, 2015 23:20

Good chum and expert modeller / painter Matt Owens-Smith posted this blog entry on his site www.wargamestableblogspot.co.uk

Once more, my thanks to Matt for giving permission to "pinch" wholesale. His step by step assembly and painting of the "Farmhouse" is well worth a read for modellers with any level of experience.

How to make MDF buildings - Part 2

This post is all about painting the recently constructed MDF building from Charlie Foxtrot Models to a decent gaming standard.

The building has been textured with a magnolia coloured masonry paint, then it's been lightly sprayed with Warlord Dunkelgelb, although any cream or light brown would suffice. You can see that the spray has speckled the roof but that's okay as it will need tidying up before it is painted anyway.

The first highlight has been applied using Foundry Base Sand shade 10A. It's been stippled on to the walls. (stipple = use a large, old brush and load with paint as if you were heavy dry-brushing, but instead of brushing, you tap the end of the brush on to the wall. If you're not sure then practice on a piece of card first.)

Next is VMC Dark Sand, again stippled to allow some of the colours beneath to show through - but only a little.

Finally I've applied white. Go easy here as white can be quite harsh; it's easy to add more if you prefer a lighter finish.

A close up of the white finish on the render (it's actually a little lighter for real!)

The doors, window frames and shutters are given a light dusting of black spray - just enough to prime the surface otherwise the 'raw' MDF really soaks up the paint. I use tiny dots of blu-tak to hold them in place.

A base coat of Foundry Forest Green shade 26A, followed by the Mid colour 26B.

Then a final highlight with Forest Green Light 26C.


Now on to the doors - I've painted a series of fake panels or planks using the Foundry Spearshaft triad. The front door is painted in a similar style to the window frames and shutters

The back door (on the right) has a Z frame and again is painted using the Spearshaft triad.


The backs of the shutters will not be seen, whether the shutters are open or closed. The interior (i.e. the backs) of the window frames are given a basic mid brown colour.

Now it's time to sort out the roof. There are various ways to paint the roof but here I present what I think is the quickest and easiest method for the standard MDF engraved tiles. Colin sells some brilliant tiling sheets in a variety of styles. Hopefully I'll do an example with some of those in the future.

The main roof - re-touched (by brush) to remove the speckles of the base colours - ready for the tiling effect. The chimney pot is painted in Foundry Brick Red shade 59A.

Select two or three suitable tile colours, e.g. natural looking greys. I've chosen the shade colour for Foundry Slate Grey 32A, Stone 57A and Granite 31A. Now simply select a colour and lightly 'colour in' a selection of tiles across the roof, about a dozen tiles per side, per colour is fine. It's a bit like dry-brushing but keep the paint within the edges of each tile. Then repeat for each of the other tile colours. Remember to do a few short sections of the ridge too.


The final stage of tile painting is to take a mid grey colour, I used Foundry Slate Grey mid 32B, and very lightly (with a large, soft brush) apply a dry-brushed highlight to the entire roof. Do this VERY lightly as you can always apply a second or third highlight.


Here's the same effects applied to the smaller extension roof.

That's the painting pretty much complete for the basic model. Next is the final assembly. The pic below shows the window sills, and the loft window, glued in position (only some of the CFM range come with two part window frames). Let these dry fully before continuing.

Next glue in the frames, then glue the shutters around the windows.

Some Window Tips
  • Make sure you use a glue that dries completely clear as it's bound to leak a little around the frame edges.
  • Always dry fit the window frames before applying the glue just to make sure they fit properly. If not then trim the frame or aperture with a modelling knife.
  • Apply a small 'bead' of glue to the inside of the window aperture on the building, then let it go slightly tacky as that improves it's 'grab' ability. This means the window won't fall out when you let go!?
  • Shutters - the kit will have enough left and right shutters - make sure you fit them in matching pairs!
So, there you have it. The basic building is done and ready for battle!


Some more tips
  • Consider using DIY/hardware store paint tester pots as base coats for walls - much cheaper than Foundry, VMC, etc.
  • When applying the highlights go easy as you can always apply more paint but it's jolly tricky to remove it.
But why stop there? Part 3 will look at basing and finishing touches such as flooring, mantle pieces, etc. Oh, and I haven't forgotten the log store.

Again, hope that's useful.

Chris Harris: thetabletopwargamers :video review October 5, 2015 00:07

Chris Harris has posted a very positive review of Charlie Foxtrot Models "Banque De France". Please view and see how my kits are presented.

Chris has a wealth of other wargaming reviews and is well worth following in you tube.

Thanks Chris.


New Releases: "Double Dial Counters" for Kings of War and 28mm 1:56 Eastern Front "Rural House 3" September 28, 2015 11:24

Having just played my first few games of Kings of War by Mantic Games, I have been so excited about getting out my fully painted Warhammer Fantasy Battles armies out of the cabinets and using them again. I have only invested in a few packs of mantic models just to "fill out the corners", the "Fleabags" are just so nice.

I have designed a double dial counter which can be customised to suit your basing style and decorated with amy specific "spares" from your bits box. Sold in sets of 8 the dials can be quickly assembled and immediatly used plain. The double dials can them be decorated as part of your army project.

Please note, the "Double Dials" are my own design and have not been made in association with Mantic Games.


With the footprint of last weeks release "Razed 1" comes Eastern Front "Rural House 3". "Rural House 3" has even more authentic features than other models in this collection and would be seen as a higher status dwelling. The model has ornately carved window and front door surrounds. A half hipped roof with waney edged cardboard planking is also included (the plastic angle piece running along the apex, like most of my kits is also included) The carved corner boards, although decorative, are to prevent damage to the dwelling from horse and cart accidents!