News
New Release: Terrace Front Yard (Plain wall version) May 27, 2015 14:24
As shown in my step to step "Table Edge Terrace" tutorial, I am now releasing the front yard with plain walls. This version differs from the red brick version, being smooth walled and having a different fence.
This model is designed to fit against both British and French versions of "The Terrace" and the "Table Edge Terrace".


New Release : "Stables" May 23, 2015 16:32
The "Stables" model is available now on the onlineshop. Ideal for WW2, VBCW or modern wargaming.
I had been working on this model for some time; having been given a unit of SS cavalry for my birthday spurred me on to finish the model.


I sprayed the flagstoned floor before assembly, then sprayed the outside grey. A light white spray, followed by a brown wash finished the walls. Total time to make and paint: 4 hours. A personal record for me!
This model was designed to fit in the "Stone barn" space of the "Farm Tile" however it would look equally as good in a field with the "Farmhouse" nearby.
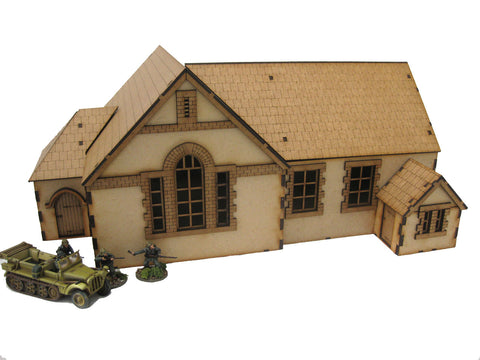
New Release: "L'Ecole" school May 17, 2015 18:49
My latest design is now available in the on-line shop.

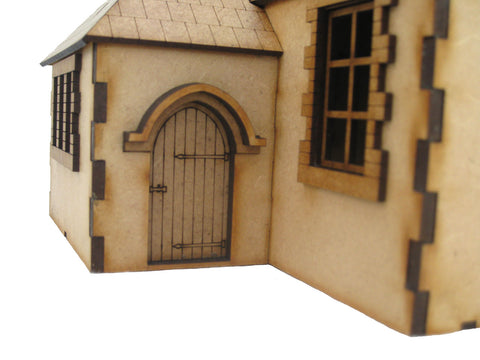
I went with L'Ecole to compliment my French range of buildings yet, this building could be pressed into service as a church, town hall, funeral parlour or chapel of rest. I have completed the packaging, recieved a supply of half round plastic strip for the capping tiles and uploaded lots of pictures into the new page on this site titled "Instructions". Please visit the Instructions Page and see how easy it is to construct this kit! A full 370mm x 255mm footprint makes this a real centre piece to any urban / village set up.
On the Workbench: School, Church, Chapel of Rest, Civic Building May 12, 2015 21:05
I have just completed a new kit. This project started on the day I opened my webstore www.charliefoxtrotmodels.com. I took a lot of pictures of this building which I found really interesting. I have spent many hours since, drawing and developing my prototype of the kit. All I need to do is complete the packaging and cut some stock, prior to release.

This building was originally a village primary school yet could easily be a church, chapel of rest or town hall. I originally was going to run with the title "L'Ecole" to further my WW2 Europe collection. Having made the model I feel it has great potential in Bolt Action, "A Very British Civil War" , alternative history and Dad's Army themed games. The Warlord Games Germans and Army Group North SDKFZ/10 give an indication of size......this kit is HUGE!

Breaking away from how I usually present my model kits (with printed instructions), I have taken step-by-step assembly pictures which would be posted on this site for reference.
I would be grateful for ideas on how I should name this multi-use kit and if you think on-line instructions are preferable to paper copies.
Colin
Guest Tutorial: "Sea Effects" by Ted Martin May 8, 2015 19:34
I was so impressed with Ted's sea effect from the pictures he submitted for the customer gallery, that I just had to ask how it was done. Ted kindly offered to do a step by step tutorial as he kept the pictures as he went along. Even if you have no immediate plans to do a beach landing, you really have to admire the skill and end result ...feast your eyes on this:
SEASCAPES
Colin produces some of the best war-games buildings available on the market today. I recently submitted some photographs for the customer gallery. Colin was interested in finding out how I had produced the beach landing scene and has asked me to provide a short tutorial. I have broken the process down into the following steps:-
1. RESEARCH
In my opinion this is the key aspect to our hobby. We have all seen fantastically detailed war-game armies displayed on the table. Large amounts of research has been undertaken to get the kit and uniform details absolutely spot on before the first dob of paint hits the figure. If we are going to put all this effort into painting our miniature warriors and the buildings that they fight over, then it is only fitting that we deploy them in correspondingly accurate terrain.
The Sea is a dynamic environment and is subject to a multitude of variables such as time, weather, sunlight etc. A beach on a spring morning will be remarkably different from an Autumn afternoon. Just like a photograph our war game terrain will be a snapshot in time. Its important that you study the environment that you wish to recreate. The sea is not always blue. It can range from various greys and greens. The colour varies with depth and wave heights vary with the wind. Its important that you pick a moment in time to model your masterpiece. If you don't have the sea nearby then the internet holds thousands of photos that can be used for inspiration. Follow the advice of Leonardo Da Vinci “Let nature be your teacher”
2. BASEBOARD
Our war game club uses a modular system so that different tiles can be fitted together on our nine foot by five foot table. Construction is on MDF or ply board with polystyrene insulation board, hot wire cut, to represent hills and gullies etc.
3. BASIC PAINT JOB
I used acrylic tube paint available from art stores. Four basic colours white, blue, green and black. Darken the blue to start painting the sea furthest from the beach. Then in blended bands start lightening the colour as it nears the beach. Add in stippled shades of green into the mid band to add depth and variation.


The contact point between the water and the land will have the largest amount of turbulence. So this needs to represent foam and churning bubbles. Later on in the process we will be using PVA. This dries clear and the underlying colours will show through into the solid PVA. Waves are formed by a combination of wind and the rising level of the beach. You will see that I have stippled light blue onto the flat board to represent the waves. This will show through the PVA to give an impression of depth.
4. PRACTICE & EXPERIMENT
As the Military say “ Prior Planning and Preparation Prevents Pretty Poor Performance”. Get some small ply or mdf off cuts and practice the above technique until you get the impression that you want. These practice boards can be used again when we practice the PVA overlay techniques.
5. TOOLS & EQUIPMENT
1.Thick PVA such as Liquitex or Mod Podge.
2.Palette Knife.
3.Flat one inch paint brush
4.Cut down round stipple brush or an old round paint brush that you are about to throw away
5.Medium spoon. Kitchen desert spoon works well but don't tell the wife!
6. Tube of clear silicon sealer that is normally used as a bathroom caulking. Ensure that it is the type that says clear or translucent. I have tried different types they all do a similar job so go for the cheapest.
6. PVA WATER BASE

Use the thick PVA for this part. I tried both Liquitex and Mod Podge and they did a similar job. Liquitex is slightly better as it drys gloss. Both are available from art shops or on line. Use the palate knife to spread a thin layer ( 2 to 4 mm) across a section of your sea base board. Its best to do this in small sections say 20cm by 20 cm. Then take the spoon and tap it up and down on the spread PVA in a stippling motion. This will raise the PVA into small peaks. Experiment on your practice boards first before moving onto the main board
Start out at sea and move towards the beach. You need to let this dry for a couple of days. It will be white when you first lay it down but will slowly dry clear. Some thicker parts may remain white if the atmosphere is damp. If you are really impatient then the wife's hair dryer can be put to good use but this normally requires a clandestine operation to obtain it.


7. WAVES
Use the bathroom caulking best applied in lines with a caulking gun. place the lines of silicon over the white stippled pre painted sections of the baseboard. Use the one inch broad brush and drag the top of the silicon line backwards from the direction of the beach. This will give you a wave front with a trailing edge. Don't worry if you get brush stroke marks as when dry this adds to the illusion of movement. gently stipple the top of the wave with the cut down stipple brush. Once again use your practice boards until you get the desired effect. Vary your brush application to test out different techniques.
HIGHLIGHT
Use the one inch flat brush and with a very small amount of white paint dry brush the top of the waves. This is best done after the board gas dried for at least a week. The Silicone will be naturally white until it finally dries clear. Dont over do the highlight. At the waters edge use the stippling brush and white highlight to give the foam and bubbles effect.
8. VARNISH
The PVA becomes clear by evaporation of the carrier medium. Observe the board over a number of days. The deeper whiteness gradually disappears however there comes a time when the balance between clear and white PVE gives a good impression of depth. If you want to stop the evaporation at that critical stage then spray the whole seascape with an acrylic gloss varnish. Once again available at good art stores or on line. Dont use enamel spray as you may get a reaction between the PVA and the varnish. Once again use your practice boards as a tester.
10.ENJOY THE VIEW
The acrylic has proved to be remarkably robust. We have had no cracking or lifting. It only requires a wipe over with a damp cloth now and again to prevent dust from dulling the varnish. Many of our mini warriors have got their feet wet over this particular game tile and it has stood the test of time. If you have any specific questions on this technique then please contact me at tedmartin21@me.com. Happy gaming.

Ted, thank you for sharing this with Charlie Foxtrot blog readers.
New Release: "Dial Counters" Pin markers, gaming aid May 6, 2015 11:49
The "Dial Counters" 5 piece set, are laser cut MDF and require assembly.
The "Dial Counters" were designed to act as pin markers or "push & shove" counters. The 40mm diameter gives plenty of scope for modelling wounded / deceased or any appropriate diorama for your chosen game system.
The counters have numbers 1 to 9 and are less likely to be picked up and rolled than marker dice.
The pictured " Black Tree" models have been painted by Paul Buller (Westwind also do some excellent WWII casualties)

New Release: Sword & Spear gaming aid 60mm May 6, 2015 11:22
After floating this on the Sword & Spear forum, feedback was very positive. I asked which MU would be best for gaming S&S with 28mm miniaures. The consensus was 60mm. So here it is, a "Sword & Spear Data Stick and token set for this scale. I would also take this opportunity to point out that, due to popular demand, I have doubled the amout of wound tokens. I must have underestimated the amount of hack 'n' slash.
I have also revised the 40mm set to include the additional tokens.


Exeter Legionary May 5, 2015 12:04
I really enjoyed the Exeter show, such a spacious venue, easy and free parking, relaxed atmosphere, good cafe....and best of all demonstration games to rival that of SALUTE. My only gripe was that there were no tournaments taking place. I do like to see competition armies composition, painting skills and styles and of course, pick up on strategic hints and tips from participating entrants. With that said, there was still loads to see...here are a few pictures I took on the day. Sorry if I took pictures which do not appear here, the lighting was just a bit too low for "regular" photography and my flash just bleaches out all the colour......apologies if I did not catch your details but I could not leave Mrs Foxtrot holding the fort on her own for long as it was far too busy.

The first picture shows my good mate Ron Leacy playing on the Charlie Foxtrot Models demo table. Here Ron looks really happy that his artillery bombardment on the first turn, after a few freaky dice rolls, knocked out his own Sherman. What a good sport! More on this table later.....just check out the range of scales & periods...

A real visual feast, I wish more of my pictures were of this quality to share.


The above 2 pictures are of another Bolt Action demo...looking very different ...the explosions look so realistic.....I will be making some of them soon. Apologies to the chap who put this game on was so open with his modelling ideas and I did not catch his name.


The above 2 pictures were taken mid battle from Rob Broom's impressive War & Conquest demo table.


The detail in this 15mm game was outstanding. I was also drawn to the wonderful gaming mat, it worked so well in this scale.
And back to the Charlie Foxtrot Table....


Ron's flamethrower house hopped and flamed Paul's Germans in the open. The "Dice Gods" were not with Ron as the German unit was still there when I came to view the game again.
Thanks again to Ron Leacy & Paul Buller for putting on the demo, doing the set up and the careful pack up too! Cheers.
Exeter will definately be in my calendar next year. Thanks to the organisers, the show went really well.
New Release: "Farm Tile" April 29, 2015 17:43
The "Farm Tile" is the latest model off the production line.....it will provide an excellent centre piece to any table with opportunities for attack / defence.
This piece is quite a size and has a massive footprint. It will transform a collection of buildings placed on a green battle mat to something more spectacular. With walls low enough to provide hard cover it also has significant gaming possabilities.
The "Farm Tile" has been designed to fit a range of Charlie Foxtrot Models buildings, the full list is mentioned in the online shop. Further additions are planned for an alternative to the "Stone Barn" pictured. Please come back and check my progress on that.


Tutorial: Step by Step "Table Edge Terrace" Part 4: finishing touches April 29, 2015 16:35
If you have just opened this blog, you can check how I got to this stage by reading the first 3 tutorials.
Before I continue the thread, I am going to give an alternative roof painting technique. I am sure you are all familiar with drybrushing so I did a couple of examples. The roof painting method on tutorial 3 is time consuming compared to drybrushing. The first image below is grey paint drybrushed going downhill. This leaves a too uniform, flat effect. It would be improved by painting a dark colour first and drybrushing a lighter tome over.

This next image has been drybrushed going uphill "against the grain" of the roof tiles. With a dark undercoat and a paler drybrush over the card tiles 3D effect will be further enhanced.

The finishing touches are my favourite part as they bring the model together and means it is almost table ready.
With the paint on the roof and wall fully dry, I mixed water to brown wash and liberally daubed this on with a downward stroke, I used a large (very) brush and worked quickly. When this initial was was dry, I repeated the process using, this time a very watery mix of Vallejo Green Brown. This time I did not go so far up the walls, keeping the weathered look closer to ground level.
The windows were trimmed from the acetate using a pair of scissors. I then used PVA to glue the windows in place. I then finished painting the shutters and glued them into position. For the white, I sprayed grey and oversparayed white. For the grey, I sprayed grey and painted a paler tone of grey on top. For the black, I sprayed black and did a highlight with a charcoal grey. On the white and grey shutters, I picked out the metal bracket hinges with black before using contact adhesive to glue in place. PVA will do the job, but takes longer to dry.


The doors were sprayed like the windows and shutters. I then went in with a brush to highlight, leaving a line of shadow, showing the base coat.

The chimneys were painted black inside and given a couple of coats of Vallejo Terracotta to complete.

The last and very satistying step is to apply self adhesive moss. I try to imagine which way is north facing and stick the moss where is more likely to be damp.

The final image........right, now what is next to paint?

I have finished with 3 whole days to spare before Exeter Legionary......I cannot wait to see this model on a fully terrained table. Ron Leacy and Paul Buller who are gaming on the table this Saturday, both have superbly painted armies, it should be a real piece of eye-candy.
New Release: Sword & Spear gaming aid April 22, 2015 17:14
Having played a few games of Sword & Spear, I was immediately hooked and quickly invested in the rulebook. This week's release has been developed alongside professional painter Kev Shilito and in consultation with Mark Lewis the author of the rule book. I am please to say the Data Stick and gaming tokens have been approved and can be labelled as the "official" set.
If you have not tried Sword & Spear, invest in a copy, it comes highly recommended!
It is fast play and makes you think throughout without getting bogged down in superflous detail. There is very little reference needed to the book ...if you have the Data Stick handy.
I did say to myself "no new projects, no new armies" and here I am planning a 15mm ancients army.
40mm x 15mm and 40mm x 30mm bases in both 2mm and 3mm are also available in the shop.


Tutorial: Step by Step "Table Edge Terrace" Part 3 April 22, 2015 09:15
If you have just opened this blog, you can check how I got to this stage by reading the first 2 tutorials.

| Once the paint was fully dried I used an "Asphalt" coloured emulsion tester pot to block colour the roof. This was applied quickly using a large brush with a smaller brush used to cut in by the chimneys and dormers. I used 2 coats to cover the card tiles. |

|
|
In this picture I have used the asphalt with "Grey Slate" emulsion mixed, watered down and applied in an almost random way. I did however try to keep the lighter paint away from the top of the tiles near the next row as this emphasises the overlap and gives a stronger shadow effect. Spending time tiling the roof with card proved to be a good investment when it came to painting.With the laser etched tiles more care is needed not to overpaint onto the next slate. With raised card picking out the edges was a lot easier and quicker to do with the same effect.
This next layer was straight from the tester pot grey slate again, I applied quickly overlapping the previous coat in an attempt to get a variety of shades on each troofing slate. Once more I avoided the shadow area at the top of the slate tile.
This picture shows the diverse way paint was applied. I often use the paintbrush sideways, instead of painting with the hairs on the brush, I go accross using the length of the brush. This sideways application gives a more natural looking random accidental efect and looks less contrieved.
|


This last picture shows 3 stages. I repeated the previous method using "Cool Slate" tester pot emulsion. Each time I apply a highlight, I cover less tiles and a smaller area on each. Applying highlights like this means each colour takes less time than the previous...great for motivation.
Once the slate was complete, I applied a lichen effect dabbing / stippling Vallejo German Orange Ochre (left over from when I attempted oak leaf pattern SS uniforms). The lichen effect was further enhanced with Vallejo "Ghost Grey", again this was a quick job as I was seeking a subtle aged / weathered effect.

I used grey primer paint to spray the windows and doors. Use a small blob of blue tac to hold the windows still when spraying to avoid blowing the pieces away. One set of windows I oversprayed black, another white. I then used a small amount of contact adhesive to bond the windows to some acetate (If I remember correctly this was from the front of a Christmas cracker box). I usually glue in the windows and then apply the acetate by gluing the window surround inside and sticking on a large piece, this avoids any glue being seen from the outside. On this occasion as both sides of the windows are to be seen, I had to take more care.
Look out for the next tutorial where the finishing touches will be applied to complete the kit.