News
Tutorial Rivers & Streams part 5 December 19, 2022 19:56
For this brief tutorial I have used some river sections to be used on my North African table for DAK and 8th Army games or my El Cid themed "Oathmark" table.
I took a River Sections 1-6 starter pack and assembled them along with a few of the 60 degree and 30 degree sections. I followed Tutorial 1 up until the Sculptamould phase then applied my texture.

I gathered a collection of pebbles, coarse grit, fine sand and finally powdery Chinchilla dust" from a local pet shop. I used an old stiff bristle artists brush and coated the top of each piece with PVA. I worked through the texture large to small, ending in the highly absorbent chinchilla dust. NOTE: I left a bare wood area at the bottom of the "river bed".

With each wadi section gritted, I set them aside overnight to dry.

Using a wide selection of Crafters, Americana and artists acrylics, I painted the pieces to blend onto my table.

I painted a mix of charred brown and black onto the parts of the wadi I had left without grit.

Next I painted over the dark base coat with paler sand tones.

The next step is really interesting. Using a clean brush, I daubed on the "crackle gel" and left it overnight to dry.

The top layer shrinks and cracks revealing the dark base coat. The crackle glaze did leave the sand areas shiny but this was taken back with a spray of Testors Dullcote.

Lastly I applied some dry grass tufts and dark green small pieces of clump foliage,
Tutorial Rivers & Streams Part 4 November 22, 2022 08:08
This last quirky piece has a back story: I was staying with good chum LLoyd Lewis for "Attack," the Devizes show in July 2022. (Thanks again mate).
Lloyd, being a Sharp Practice fan, was showing me his miniatures collection when I noticed his French Indian Wars deployment point. Beavers! The idea was brazenly pinched as the next day I bought a blister pack from Bad Squidoo.
I offered up the beavers to a 60mm base and thought it looked too crowded. I had 2 left over and a though occured to me.......
I dried a pile of dead twigs picked from the garden and "baked" them on top of the log burner.

The "Estuary Section" from the Rivers collection was the obvious choice (I had this project in mind when drawing it). I took the section up to brown basecoat stage and then started work on the dam. Firstly I took one of the larger twigs and split it lengthways and then sanded the base to fit flat to the estury bed.

I wanted to be able to use the estury "as is" in a variety of games; the beaver dam needed to be removable. I came up with an idea: cling film.

I built up the dam using progressively thinner twigs and bonded each in place with cheap, runny superglue.

As the structure developed and grew, it began to feel sturdy enough to lift off. Only one part had adhered to the cling film which I gently trimmed off. The result was a robust, removable dam.

Next, I painted the beavers and positioned them onto the base painted structure. I sat the painted minis on a blob of greenstuff and left them to dry.

The metal bases of the beavers were then disguised by adding small, thinner twigs until I was happy with the effect. The twigs were then painted to match the rest of the dam. I then picked out the cut ends or areas where bark had been removed. Blotches of pale, watery grey were added to some twigs and dabs of GW Agrax Earthshade to others. The bleached bone ends and a few selected twigs were fiven a Flory "Grime" wash.

The next stage was adding some green foliage to represent floating debris getting filtered out by the dam. Moss pads were also added to break up the expanse of wood.


And when stored away for another day, the estuary can be "opened" for different theatres. I can just see canoes coming upriver on this piece.

Tactically sound? Of strategic importance? I will let you decide. It was a fun build and will certainly add "flavour" to my forthcoming French Indian War table. I have since noticed that Annie also offers a Bad Squidoo Moose....that is on my shopping list!
This project still has a little way to go and I will be adding to the thread in a few weeks.
Colin
Tutorial Rivers & Streams part 3 November 20, 2022 11:11
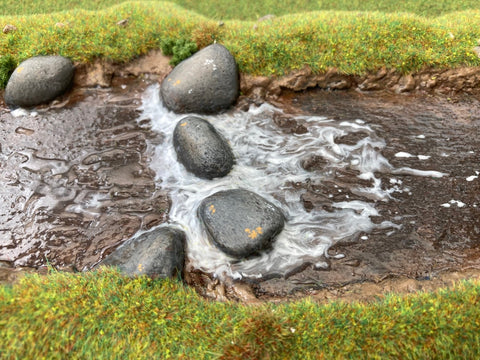
This next technique is valuable to show movement in the water and how different scenic pieces can be enhanced by white water.


On this river tributary section, I completed the modelling like all other sections and made the following enhancement. I used 2 part clear epoxy resin from the pound shop and "daubed" it with a cocktail stick in places where I felt the water would be agitated. I left this to partially dry for some 15-20 minutes (try on a scrap piece first!). My next step was to mix a small amout of clear epoxy resin and stir in a small amount of white acrylic paint. I then added the whitened epoxy resin again using a cocktail stick and dragged, swirled and daubed in the direction I thought the water would flow.
For an extreme highlight, I added a further dab of white acrylic to the mix and repeated the process on the "crests of the waves".
This technique has been used for a number of my "special sections".
First being the Ford. The Ford Section is part of the River Starter Set and provides another crossing point.
The Ford Section was made with lower river banks at the widest point. Small pebbles and gravel (rounded from a fish tank) and sand was glue onto the banks and along the centre where I wanted shallower water. Note alos the dark brown of the river bed did not fully coat the piece and a paler "shallows" was left.

The gloss varnish, epoxy resin and finally flock and tufts were applied.

A close up of the ford section shows how the addition of white water enhances the illusion of water flowing.

This stepping stone piece provides a crossing point over a stream. The white water I wanted deeper and with more movement. I followed the same steps as the ford section and using clear epoxy resin I built up an area before and after the painted pebbles. I allowed this to set overnight then repeated the clear, clear with white acrylic mix to get the desired effect.

Multiple crossing points are, in my opinion, essential on the wargames table. Just one provides less tactical options and all focus is directed on one point of the battlefield. This idea was more "rustic" a fallen log bridge. I searched the garden for a suitable long dead twig and placed it on the top of our log burner for 3 succssessive evenings to thoroughly dry it out. Why 3 evenings? I was not ready to work on it until then!
I built up the riverbanks and trimmed the twig to sit flush with the river bed. The unpainted twig was then pressed into the still wet sculptamould giving an indentation to use as a locating point later.
The log was painted in a variety of browns and greys and glued into place. This was follwed by the usual flocking, tufts and white water. I then used self adhesive "mininatur" moss pads along one side of the fallen tree.


I am working on another, final section for my collection and will post " Tutorial Rivers & Streams part 4" soon.
Tutorial Rivers & Streams part 2 November 19, 2022 18:21
Following on from the last turorial "Rivers & Streams" where I covered the basics this brief tutorial deals with what I refer to as "special sections".
"Special Sections" should be just that. Special. The majority of your river should be plain stretches with minimal additional scenic features.

A simple addition to just applying flock to the banks are tufts, flower tufts and tree foliage.

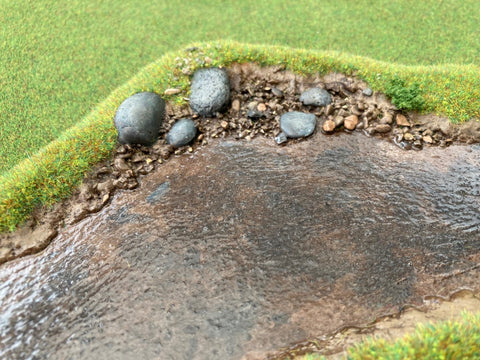
A cheap and quick addition to vary your rivers and streams are pebbles, gravel and sand. Before applyimg the sculptamould, I used superglue to glue the rocks to the base, using flat bottomed pebbles to appear partially submerged.

I painted the rocks and river bed before applying the gloss varnish. As some splashed onto the rock, it was left. If too much gloss coats the rocks, you can over paint with matt varnish.

Varnish, flock and a few tufts finished this stretch.
Having a river or stream on a wargames table can be a real obstacle to troop movement so I produced a number of crossing points. Starting with the obvious: I used the 10" River Section R9 and a Debris of War cast resin bridge. First I placed the bridge onto the base and pencilled the footprint. Next I built the banks up close to but not touching my pencil marks.

When that had dried, I painted the banks with my "mocha" emulsion and sprayed the resin (after a soapy wash) with primer. I glued the bridge in place with epoxy resin.

Next, I filled the gap between the bridge and the river banks with more sculptamould.

When the sculptamould had dried I used polyfilla to taper the bridge to the base. As the filler dried, I gently stippled the surface with a coarse brush to give some texture.

Dry and ready for painting.

I painted the riverbed then the bridge before applying any gloss varnish to the "water".

Flocked, weathered and enhanced with tufts and tree foliage.


The "Debris of War" bridge is such a nice addition, I have ordered 2 more for my table.
Look out for part 3 coming next.
Tutorial: Rivers & Streams October 23, 2022 19:19
To support the launch of the Charlie Foxtrot Models "Rivers and Streams" I have produced the following step by step guide with kind permission from Geoff Lacy of Purple Lion Creations.

I have been supplying Geoff with "River Ends" in this format for the past 4 years.

The following is a development where I have removed the bracers and integrated the separating strip into the river and stream beds.
I visited Geoff a few times at his workshop and saw first hand how he produces top quality river sections. This guide is largely based on Geoff's method.

The redesigned Rivers and Streams are supplied as 6 piece "Starter Sets" with individual pieces and expansion lengths supplied separately.

Each set (and individual piece) is supplied with 4 ends and "magnet stops" held on a multi use frame.

The first step (optional but recommended) takes approximately 3 minutes per 12" river strip. Using a craft knife, I chamfered the edge to approximately 1mm. The tapered edge reduces the step up to the riverbanks and blends better when on the table.

Using a craft knife remove the river ends and "magnet stops" from the frame. DO NOT DISCARD THE FRAME. Bond the ends to the base using a wood work quality PVA. Use the square corner of the frame to ensure the ends are vertical. Set aside to dry and revisit in 10 minutes to ensure the ends are still vertical. Adjust before the glue fully sets. When dry slighlty chamfer the end pieces with a craft knife.

When the ends have fully dried, glue on the magnet stops. They strengthen the joint and prevent the magnets being inserted too far.

Using a hot glue gun, bond expanded polystyrene packaging pieces following the profile of the river bank. Expanded polystyrene may be substituted with off cuts of foamcore card. Trim the pacing pieces to size aiming to keep below the end profile.

The end piece frame has an appropriate curve along one edge. You can offer this up to see if you are "near enough". Some variation in height is to be encouraged. The end height is the most important: keep the polystyrene below the profile curve.

I mixed tile grout (tile adhesive or artex works equally well) with fine sawdust.
The sawdust was added to bulk out the grout and reduce the cost per piece. I used a spoon to measure out 50/50 grout powder and sawdust. This was mixed before water was added. Ready mixed artex or tile grout may be used and sawdust can be added to this to make it go further. A drop of water may be needed to keep the mix moist enough to adhere to the polystyrene.
I applied the grout / sawdust mix using an artist's palette knife. I found it quicker to work on one river bank at a tine and do the opposite edge once the first has dried.
The curved profile on the frame may be used as required to check the height of the wet material and this can be adjusted before it dries.

When the banks are fully dry, the next stage is applying a coat of "Sculptamold" over the grout sawdust mix. This I did by spreading the mixture with a thumb and stippling with a wet stiff paintbrush. Final height adjustmant can be done and the banks can be smoothed or textured to suit your taste.

To add texture and "movement" to the river, I spread watered down filler using a stiff bristled paintbrush. Brush strokes were left in the filler in the direction of the water flow.

A closer image of the directional brush strokes along the river surface.

After 10 minutes or so, the polyfilla had set and I then gave the piece two coats of emulsion paint. The paint used was "Johnstone's Wall & Ceiling paint Matt Mocha".

Having painted the river bed I decided to add further texture as the previous textrue was too "linear". I loaded a soft brush and holding almost horizontal, rolled the brush side to side to generate a random effect.

Using the paintbrush almost horizontal again and rolling the brush while dragging along the length of the river, I applied a watery mix of "Charred Brown" Vallejo Game Colour no. 72.045 mixed with 50% black.

Apply subsequent "blotchy" washes of the paint mix until you are happy with the depth of colour. Next I added a watery splash of Daler Rowney acrylic "Phthalo Blue".

When the blue was dry, I coated the whole river bed with gloss varnish from a DIY store. In this image the varnish is still wet and shows how it was applied in a "blotchy" organic way.

The brown riverbanks were given a drybrush of earth brown and more varnish was applied. Keep layering up the gloss varnish until you are happy with the light reflection.


The riverbanks were flocked with a static grass applicator. Gravel, tufts and flowers can be added to suit your table.

Prior to gluing in your diameter 5mm magnets, check the ends are free from glue, dried paint or static grass. Ensure the holes are free of debris too. Use a craft knife to trim as required. This stage will ensure that the rivers butt up together without a gap.

Take a column of diameter 5mm thickness 3mm magnets and glue one into the left hand marked hole on the now empty frame. Reverse the magnet column and glue one into the right hand side hole.
When gluing magnets into the rivers, offer up to the left hand side and if it attracts, glue the column of magnets one at a time in each left hand side hole. Reverse the column of magnets, check they are attracted to the right hand magnet on your frame and if so, glue in all right hand magnets.
Retain the frame with the 2 magnets in for future expansions to your rivers and streams. If you decide to use different colours for the banks or water, make a note so you can match in later.

Once I had completed my river sections, I cut expanded polystyrene into strips and lay them on the river bed before wrapping and storing in a really useful box.
The expanded polystryene will help prevent the "special features" or tufts from getting flattened once the river sections are stacked.
Further images will be added as I am currently working on other ideas for decorating the basic Rivers & Stream sections.
Troubleshooting.
After applying the grout / sawdust mix, check to see if there is any bowing as the filler material has the potential for some shrinkage as it dries.

Like the piece pictured, the majority will remain flat. Hold a steel rule to the underside to check the piece is flat and true.

Should a piece have a bow press thunbs into the underside while gently pulling either side. This will flatten the MDF (check true again with a straight edge). Do this check and adjustment prior to applying the sculptamold.

This is my first attempt at texturing and painting the river bed. As previously metioned, I reapplied more watered down filler to remove the harsh lines in my original. The blue (in my opinion) I applied far too thickly and was not happy with the result. I simply painted over with a coat of Mocha emulsion to reset and tried again. Should you "over texture" the river bed, remember it is wood and can take a light sanding.
I hope you find this tutorial useful and informative.
cheers,
Colin
New Release: 28mm 1/56 Chapellerie Back yard & Debris of War Bins Trash Cans September 29, 2022 20:19
On 8th 9th October I will be putting on a demonstration WW2 game in Saltash as part of the annual model show. In prepping my table I was prompted to draw, cut, assemble and paint a back yard for the Chapellerie kit I made some years ago. This kit is now available on the Charlie Foxtrot Models website along with the superb Bins/ Trash Cans by Debris of War.


Holiday Notice: July 30, 2022 13:54

From 6th August - 21st August we will be away visiting family in Kuala Lumpur. I will be doing a "last post" on 5th August. Orders may be placed while we are away and will be processed in date order on our return.
I will be taking the lap top as I have a few ideas I want to draw as we wait at the airports.
In other news, I played the "last post" for my van today which was towed to the scrapyard. My £54 new tyre went 17 miles and £217 of repairs enabled it to start 3 times before it finally died. I will be hiring a van for Colours and Warfare as accommodation and table fees have already been paid. I need to have a long think about shows for 2023. How odd that it feels like losing an old friend.

New additions to the Pantile Collection. July 8, 2022 09:37
I have been following Carlos Elias Llop from Madrid over the past few years on Facebook. Carlos is an accomplished modeller and scratch builds buildings of Spanish architecture. Inspired by his images (and a little guidance from him) I designed a "new wave" of kits to add to this popular range.
I started by trimming and filing a sheet of pantile card. The size of the individual tiles dictated the eventual size of the finished roof in that I needed to work with whole tiles.
From a range of internet search images, I calculated the pitch of the roof and made a master.


The master was sent off and shortly after, the first cast came back from Slug Industries...swiftly followed by another 4 so I could complete this wave of models.
After drawing, prototyping and eliminating snags, I followed my own tutorial. Here are the steps I took the buildings through.

Assembled and textured.

Honey brown.

Honey brown / tan mix

Pure tan, followed by bleached sand drybrush and patches of GW Agrax Earthsahde.

Roofs base coated with Dulux emulsion and shutters on "Carthouse 2" painted with Foundry "Union Trouser Blue" (left over from an earlier project).

I painted the doors and windows and glued the windows to some clear acetate (blister packaging is great for this). Once the glue had dried, I cut around each piece with small scissors.

Windows and balconies painted and glued in place, fascias painted and a little Agrax Earcthshade on the roofs completes the new additions to the range.
New Release: Fantasy Oathmark "Well of Prophesy" June 4, 2022 12:40
Drawn for personal use in the Oathmark military expedition 3 "The Well of Prophesy" scenario 3: "Securing the Well" from the "Oathbreakers" supplement (Written by Joseph A McCullough published by Osprey Games.)
I had a lot of fun doing this piece, very niche I know but I think it looks the part. I will certainly get a lot of use out of this.

Holiday Notice April 18, 2022 21:18
Thankfully my bout of Covid came and went before my boating holiday on the Norfolk Broads. I will be leaving on Sunday 24th and returning to work on 3rd May. I will be posting out on Saturday 23rd.
The website will remain open for orders and they will be actioned on my return.
Emails will also be answered commencing Tuesday May 3rd.
Please email if you would like to pre-order and reserve any items for Legionary in Exeter on May 7th.
Thank you for your patience to this disruption to service.
Cheers Colin
![]()
Temporary Disruption to Service. March 30, 2022 15:40
Updated 9.4.22 Clear and "normal" service has now been resumed. Thank you for placing orders while I have been ill and your patience in waiting for me to visit the post office. As I had only mild symptoms, I have worked through and shipped almost all orders today.
![]() Updated 6th April : Today feeling overly optimistic I did another lateral flow test. Apologies to those of you who have placed orders but I am unable to post out just yet having another positive.
Updated 6th April : Today feeling overly optimistic I did another lateral flow test. Apologies to those of you who have placed orders but I am unable to post out just yet having another positive.

Today (30.3.22) I tested positive for Covid which means I will not be going to the post office for the next 5 days or so. I will wait until I get 2 clear lateral flow tests before I venture out for your protection and the safety of others.
Orders can still be placed on the website which will be cut and stacked until I am in the clear.
Please accept my apologies for this disruption in service.

Holiday Notice March 7, 2022 17:44
Charlie Foxtrot Models will be taking a short break from 12th to 19th March.
Orders and emails will be actioned in date order on our return.
I will be posting out on Saturday 12th with as many orders as I can.
I am also squeezing a week off in April: dates to follow.
Next show for your diaries is Exeter Legionary on May 7th.
Colin.